Thu 9 Sep 2004
How to compress a mix
Posted by naz under Uncategorized
No Comments
How to Compress Your Mix for b00mb0x
Ingredients
You’ll Need
–
CDex (freeware)
a mix
I should mention at the front of this tutorial that if your mix isn’t compressed enough for the site, we’ll compress it for you. So if you don’t want to learn this; please go about doing whatever you’ve been doing. If, however, like the young moth who yearns to cocoon in study so he may one day flourish like a butterfly, you would like to learn this yourself and save us the timehttp://b00mb0x.org. well here ya go:
When saving your mix in whatever program you have used, you want to save as a WAV file. NOT as an mp3 file. Save this file somewhere temporary where you can find it. It will be quite large.
Now, download, install and run CDex.
This is the program you will be using to compress your mix.
We need to adjust your encoding settings (how the mp3 will be compressed). This will be one time only if you will only be using CDex to compress mixes for our
site:
Select Options from the top menu, then select Settings. (Or just
hit your F4 key)
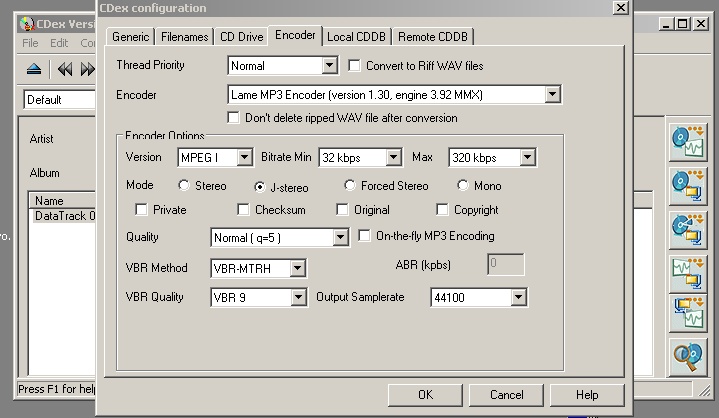
Select the Encoder tab (it should be auto-selected the first time this window opens) and change the settings to look like below:
|
CDex Configuration Settings for b00mb0x Thread Priority – Normal – Normal should be fine for you. Setting this higher will allow your mp3 to encode fast, but at the expense of the rest of your computers performance. Encoder – LAME MP3 Encoder
|
For the record, if you want to save your mix at a higher quality for your own purposes, all of these settings apply for the most part. A decent higher quality setting without giving away the file-size cow is to keep all the above settings, but change Quality to High (q=2) and change VBR Quality to VBR 2. For super-bestest-ever quality change to VBR 0 but at that point, why not just keep the WAV file you freak?
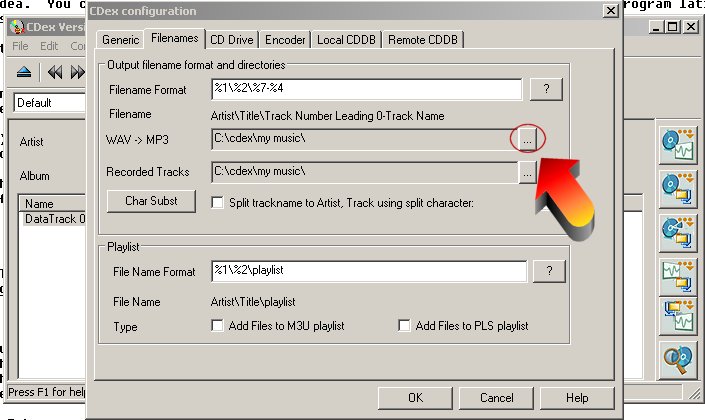
Now hit the Filenames Tab.
Next to Wav–>MP3, hit the triple dot button (http://b00mb0x.org.). Select
the folder where you want your mix to be saved once an mp3. Pick somewhere you can easily find it (like Desktop).
Now you have your settings ready. Click OK.
You now want to select, from the buttons on the right side, the fourth large button from the top (the third from the bottom). The popup text will say for this button “Convert WAV File(s) to Compressed Audio File(s)” (Below pic – 1.).
A windows will popup where you now must find where you saved your WAV file. Hit the triple dot (http://b00mb0x.org.) button next to Directory (Below pic – 2.).
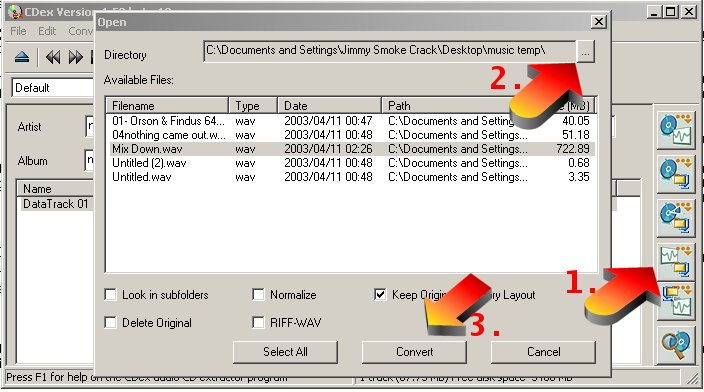
Find the folder your WAV file is in and select it. All WAV files in that file will be shown now in the window below. Highlight your mix and hit the large
CONVERT button on the bottom (Above pic –
3.)
If you have an ancient processor like mine (300mhz Celeron), go get some dinner as this will now take 2 hours.
Tutorial by assorted
No Responses to “ How to compress a mix ”