Tue 21 Sep 2004
Very Basic Acid Tutorial
Posted by naz under Uncategorized
[12] Comments
|
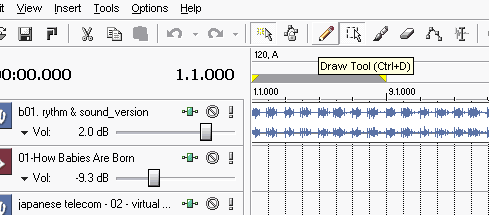
Using Acid Pro as a mixer by naz Note: this is a very basic Acid tutorial. If this isn’t of any use to you, try fucking yourself Like Soundforge, Acid wasn’t designed as a mixer. It’s a sequencer that happens to perform very adequatedly as a mixing program. As it is professional software, there is a learning curve when trying to use it for mixing. Part One: MULTITRACKING Use the view > explorer option to display the file explorer. Drag a sound file into the centre of Acid. The beatmapper dialog will appear for long tracks. You can skip ahead to the beatmapper part of the tutorial now or later. For this part I cancelled the beatmapper wizard.
A track will appear on the left part of the work area. To start your mix, click the pencil icon and click and drag the waveform right. This can take a while and its quite awkward. To multitrack, load a second file into Acid and start dragging where you want to start the overlap between tracks one and two. Part Two: ENVELOPING A volume envelope allows you to control the volume levels. Right-click a track, Insert Volume Envelope. A brown line will appear. Right click the line where you would like to begin a volume transition, select add point. Add another point where you would like the volume transition to end. Drag the points to manipulate volume.
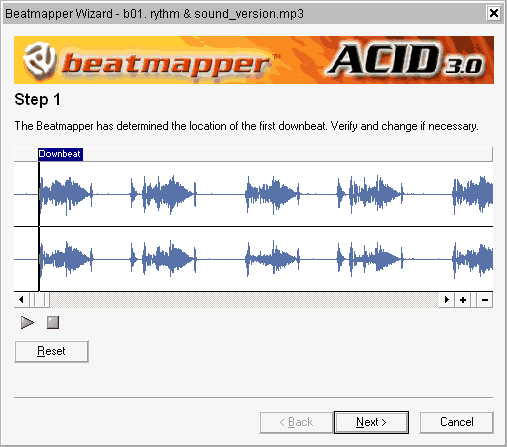
Part Three: BEATMAPPING When you load a large file into Acid, the beatmapper dialog appears. Beatmapping your tunes allows you to seamlessly mix tunes that around the same tempo. Sometimes. Firstly, Acid will attempt to locate the first downbeat. This, to me, means the first strike of the standard beat of the tune. Acid often gets it wrong. The below picture depicts a minimalist techno track, you may have to find the downbeat yourself.
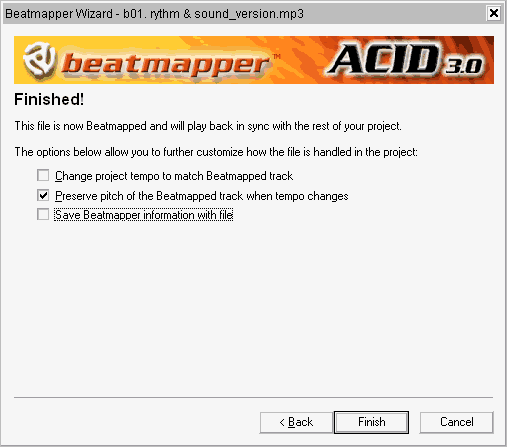
After the downbeat has been defined, Acid attempts to create a loop. A properly beatmappedloop, if played continuously, will sound natural, no clicks, in time. Sometimes. The best way to get used to mapping the length and tempo of a loop is by experimenting with a dance track. When you have defined the loops correctly, proceed to the next screen. Inspect a few loops, to see if it remains in time. If so, click next and select Preserve Pitch.
The bottom left of the work area contains the tempo control for the entire project. If the project is set at 120 BPM and you beatmap a tune at 80 bpm, the tune will run at 150% of its proper tempo. Set the project tempo to whatever your mix material has been beatmapped at. You should aim to mix tunes of similar tempos together for the best sounding results. To change the project tempo half-way through a mix use Insert>Key Tempo change. Part Four: EXPORTING File> Render As. Have |
 Â
 
 Â
  Â
Â
stupid guide
you’re welcome to post your own 😛
i am designing a giude right now beaucse this stupid
May I rec spell and grammar check before you finish your design?
Evidence that some kids just need more parental guidance while on the computer.
Thx for this “Basic” guide, I am a stupid person, and it hepled me as a tutorial !
thx also… all i ever knew how to do with acid was to drag and drop sound bytes and move them around… didn’t understand the beatmapper… didn’t know about the volume envelope… thx.
even noobs need guides…
where’d exportin go?
lala it says rite there under exporting
File > Render As
god
how dum can ppl be
God : u’d be surprised
Dont listen to the naysayers. At least you took the time to help those that didnt have a clue how to use acid. Thanks
“i am designing a giude right now beaucse this stupid” I must give a special shout out to the very special Donkey Boy who wrote this because it gave me super giggle pants and made me lose control of my bladder.
As for the tutorialrama it sure sounds like you did good but I really don’t know cause everytime I take acid I see downbeats and upbeats and drumbeats and deadbeats and all sorts of stuff, and everything’s in crazy time signatures and blue is my friend.
Anyways I wanna give a shout out to my nuh, Rob Himself.
Oh yeah, and to Hugh Jeweener.
You’re my boy, Blue!!
NO, the answer is always NO!